A fix slipping belt on treadmill issue can be frustrating and potentially dangerous, making workouts less effective and increasing the risk of injury. This problem is often caused by improper belt tension, misalignment, insufficient lubrication, or a loose drive belt. Fortunately, most slipping belt issues can be resolved with simple maintenance steps. In this guide, we will walk you through how to identify the cause of a slipping treadmill belt and provide step-by-step solutions to fix slipping belt on treadmill effectively. By following these steps, you can extend the lifespan of your treadmill and ensure a safer, smoother workout experience.
Identify the Problem
Before making any adjustments, you need to determine the cause of the slipping belt. Start by checking if the belt is too loose by lifting it at the center; if it rises more than 2-3 inches, it likely needs tightening. Inspect the belt for signs of wear, such as fraying edges, thinning material, or visible cracks. A worn-out belt may not grip properly and should be replaced. Also, pay attention to whether the belt slips when you walk or run, as this could indicate insufficient tension. Additionally, check if the belt is shifting to one side, which may suggest misalignment. Identifying the root cause of the issue will help you apply the correct fix and prevent further problems.
Turn Off and Unplug the Treadmill
Safety should always be the first priority when performing treadmill maintenance. Before making any adjustments, turn off the treadmill completely and unplug it from the power source. This step prevents the machine from accidentally turning on while you are working on it, reducing the risk of injury. Unplugging also protects the treadmill’s electrical components from potential short circuits or malfunctions during the repair process. Some treadmills may have safety keys that need to be removed before maintenance. Ensuring the machine is fully powered down before proceeding will create a controlled and safe environment for troubleshooting, allowing you to focus on resolving the slipping belt issue effectively.
Tighten the Belt
If the treadmill belt is slipping, it may be too loose and require tightening. To do this, locate the rear adjustment bolts, which are usually found at the back of the treadmill near the belt. Using an Allen wrench, turn both bolts clockwise in small increments, typically a quarter-turn at a time. Avoid over-tightening, as this can put unnecessary strain on the motor and rollers.
After each adjustment, test the belt tension by lifting it in the center. Ideally, the belt should lift about 2-3 inches; if it lifts higher, it is still too loose. Once the correct tension is achieved, turn the treadmill on at a slow speed and walk on it to check if the slipping has stopped. If the belt still slips, repeat the process with small adjustments until the issue is resolved.
Align the Belt
A misaligned treadmill belt can cause slipping, uneven wear, and potential damage to the treadmill. If you notice that the belt is off-center, you will need to realign it. First, identify which side of the belt is shifting too far. Then, locate the rear adjustment bolts and turn the bolt on the misaligned side in small increments. If the belt is moving to the right, turn the right bolt clockwise or the left bolt counterclockwise.
If it’s shifting to the left, do the opposite. Make minor adjustments and observe how the belt responds after each turn. Once the belt is properly centered, turn the treadmill on at a slow speed and check for any further drifting. If necessary, continue fine-tuning the alignment to ensure smooth and even operation.
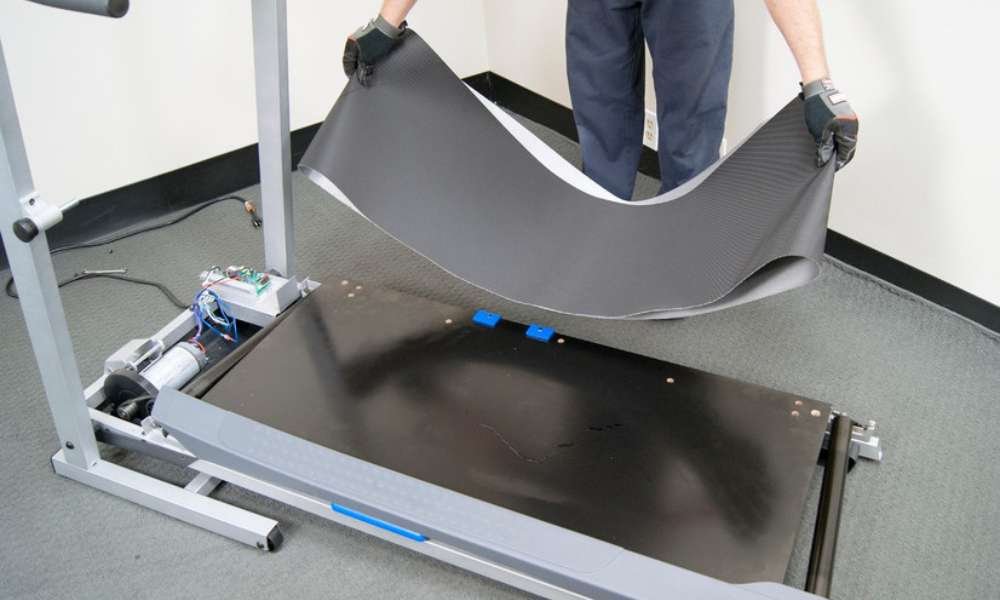
Lubricate the Belt
Proper lubrication is essential for maintaining smooth treadmill operation and preventing excessive friction between the belt and deck. Over time, a dry belt can create resistance, leading to slipping and increased wear on the motor. To lubricate the belt, first, check the manufacturer’s instructions for the recommended type of lubricant, as using the wrong kind can damage the treadmill. Most treadmills require a silicone-based lubricant. Lift the belt slightly and apply the lubricant evenly underneath, focusing on the center rather than the edges to prevent it from seeping out.
Be careful not to over-lubricate, as too much lubricant can make the belt slippery, leading to safety hazards. Once applied, turn on the treadmill at a slow speed for a few minutes to help distribute the lubricant evenly. Regular lubrication, as recommended by the manufacturer, will help extend the treadmill’s lifespan and ensure a smooth workout experience.
Check the Drive Belt
If the treadmill belt continues to slip even after adjusting its tension and lubrication, the issue may be with the motor drive belt. The drive belt connects the treadmill’s motor to the rollers and is responsible for transferring power to the walking belt. Over time, this belt can become loose, worn out, or stretched, reducing its grip and causing slippage. To inspect the drive belt, unplug the treadmill and remove the motor cover, typically located near the front of the machine.
Check for signs of wear, such as cracks, fraying, or excessive slack. If the belt appears loose, tighten it according to the manufacturer’s instructions, usually by adjusting the motor mounting bolts. If the drive belt is excessively worn or damaged, replacing it may be necessary. After making any adjustments or replacements, test the treadmill at a slow speed to ensure the slipping issue is resolved.
Test the Treadmill (Fix Slipping Belt on Treadmill)
After making the necessary adjustments, it’s important to test the treadmill to ensure the slipping issue is fully resolved. Start by turning the treadmill on at a slow speed, around 1-2 mph, and carefully walk on it. Pay attention to how the belt moves under your feet—if it still slips, you may need to make further adjustments. Gradually increase the speed while maintaining a steady pace, checking for any unusual movement or shifting of the belt.
If the treadmill runs smoothly without slipping at higher speeds, the issue has likely been fixed. If slipping persists, recheck the belt tension, alignment, lubrication, and drive belt. Running a few tests before regular use will help confirm that the treadmill is functioning correctly and safely, preventing further damage or potential injury.
Seek Professional Help if Needed
If the treadmill belt continues to slip despite tightening, aligning, lubricating, and checking the drive belt, it may be time to seek professional assistance. Some issues, such as a worn-out motor, faulty rollers, or damaged electronic components, may require expert diagnosis and repair. First, refer to the treadmill’s user manual for troubleshooting tips and manufacturer-specific recommendations. If the manual does not provide a solution, consider reaching out to the treadmill’s customer support or a certified technician. Attempting complex repairs without proper knowledge can lead to further damage or void the warranty. A professional can accurately assess the problem and ensure that your treadmill is repaired safely and efficiently, helping you get back to your workouts without further complications.
Read more: How Long Should I Run on Treadmill to Lose Weight
Conclusion
Learning how to fix slipping belt on treadmill can save you time and money while ensuring your treadmill operates smoothly. By inspecting and adjusting the belt tension, aligning the belt, and applying proper lubrication, most slipping issues can be resolved without the need for professional help. However, if the problem persists despite these efforts, seeking expert assistance is always a good option. Regular maintenance and timely adjustments will help you fix slipping belt on treadmill effectively, extending the lifespan of your equipment and providing a safer, more efficient workout experience.