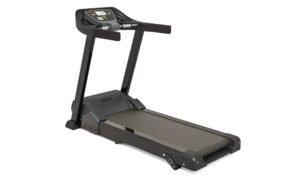

Taking a treadmill apart may seem like a challenging task, but with the right tools and approach, it can be done efficiently and safely. Whether you need to move, store, or repair your treadmill, properly disassembling it will prevent damage and make handling the bulky equipment much easier. This guide will walk you through the step-by-step process of taking your treadmill apart, from preparing your workspace to carefully storing each component. By following these instructions, you’ll ensure a smooth breakdown process while keeping all parts organized for easy reassembly later.
Preparation
Before you begin disassembling your treadmill, the first step is to unplug it from the power source to eliminate any risk of electrical shock. Safety should always be a priority when working with heavy or electronic equipment. Next, gather all the necessary tools, such as screwdrivers, Allen wrenches, and pliers, to ensure you have everything needed for a smooth disassembly process.
It’s also important to create a spacious and organized work area. Move any obstacles out of the way and make sure you have enough room to lay out parts as you remove them. Keeping small screws and components in labeled bags or containers will help prevent losing them during the process. A well-prepared workspace will make reassembling the treadmill much easier later on.
Remove the Console
The treadmill’s console is one of the most delicate and essential components, so handling it with care is crucial. Begin by locating and disconnecting any wires connected to the console, taking note of their positions to make reassembly easier. Some consoles may have multiple wire connections for power and controls, so double-check to ensure all are detached. Once the wires are removed, use the appropriate screwdriver or wrench to unscrew the console from its frame.
Be sure to support the console as you remove the last screws, preventing it from falling or sustaining damage. After detaching the console, carefully lift it off and place it in a secure location, away from heavy tools or objects that could scratch or break its screen.
Detach the Handrails
The handrails provide support while using the treadmill, but they must be removed to make disassembly easier. Start by locating the bolts or screws that secure the handrails to the frame. Depending on the treadmill model, these may be positioned at the base of the handrails or near the console. Use the appropriate wrench or screwdriver to carefully loosen and remove the bolts. Once all the fasteners are detached, gently pull the handrails away from the frame.
If they are tightly fitted, you may need to wiggle them slightly to release them. Be sure to set the handrails aside in a safe area, keeping the bolts and screws in a labeled bag for reassembly later. Taking your time with this step will help prevent damage to the frame and ensure a smoother breakdown process.
Fold or Disassemble the Deck
The treadmill deck is one of the largest and heaviest parts, so proper handling is essential. If your treadmill is foldable, lock the deck in the upright position to make it easier to work with. For non-foldable models, you will need to remove the bolts securing the deck to the frame. Using a wrench or screwdriver, carefully unscrew each bolt, ensuring you keep track of where they were positioned.
If necessary, have an extra pair of hands to help hold the deck as you detach it from the frame to avoid injury or damage. Once removed, place the deck in a secure spot, as it can be bulky and difficult to maneuver. This step is crucial for transporting or storing the treadmill, as removing the deck significantly reduces the treadmill’s weight and size.
Remove the Belt and Motor in Treadmill Apart (If Needed)
If further disassembly is required, the next step is to remove the treadmill belt and motor. Start by loosening the belt tension by adjusting the rear rollers, typically located at the back of the treadmill deck. Use the appropriate wrench to turn the adjustment bolts counterclockwise until the belt slackens enough to slide it off easily. Carefully remove the belt, ensuring that you don’t damage the rollers in the process. If the motor also needs to be removed for transport or storage, locate its mounting bolts and use a screwdriver or wrench to unscrew them.
Before disconnecting the motor, take note of how the wires are connected to ensure proper reinstallation later. Some treadmill models have a heavy motor, so consider having assistance when lifting it out of place. Store both the belt and motor securely, keeping all bolts and small components in labeled bags for easy reassembly.
Disassemble the Frame
With the major components removed, the final step is to take treadmill apart the treadmill frame. Start by identifying and removing any remaining screws or bolts holding the frame sections together. Many treadmills have a main support frame that can be split into two or more parts for easier transport. Use a wrench or screwdriver to carefully unscrew these connections, ensuring you don’t strip any bolts.
If certain parts are tightly fitted, you may need to gently wiggle or tap them with a rubber mallet to loosen them. Once disassembled, organize the frame pieces in a way that makes transportation and storage efficient. Keeping all screws and connectors in labeled bags will simplify the reassembly process later. By breaking down the frame into smaller sections, moving the treadmill apart becomes much more manageable.
Store or Move the Parts
Once the treadmill is fully disassembled, it’s important to properly store or transport each part to prevent damage and make reassembly easier. Start by gathering all screws, bolts, and small components, placing them in labeled bags or containers so they don’t get lost. Grouping parts together based on their function—such as console hardware, frame screws, and motor components—will help streamline the reassembly process. When moving the larger pieces, such as the deck, frame, and motor, take care to avoid scratches or impacts that could cause structural damage.
If transporting the treadmill to a new location, consider wrapping delicate parts like the console in protective padding or bubble wrap. If storing, keep the parts in a dry and safe location to prevent rust or deterioration. Proper organization and careful handling will ensure your treadmill remains in good condition for future use.
Read more: How to Disassemble NordicTrack Treadmill for Moving
Conclusion
Disassembling a treadmill may seem complex, but by following a structured approach, you can take your treadmill apart safely and efficiently. From preparing your workspace to removing the console, handrails, belt, motor, and frame, each step ensures that the process is smooth and damage-free. Properly organizing screws and small parts in labeled bags will make reassembly much easier when needed. Whether you’re moving, storing, or repairing your treadmill, taking the time to carefully disassemble and transport it will help maintain its longevity and functionality. By following this guide, you can confidently handle the process and ensure your treadmill remains in great condition.